How to Texture Paint in Blender Without Complex UV Unwrapping (Beginner Tutorial)

Feeling overwhelmed by UV unwrapping in Blender? You’re not alone.
This article marks the second collaboration between VIVERSE and Jamie Dunbar, a seasoned 3D artist and educator with over 15 years of experience in the animation industry. In this beginner-friendly guide, a fast and frustration-free workflow for adding color to your 3D model is demonstrated, all without getting lost in the technical details of manual UV unwrapping. Below, you’ll find the step-by-step process broken down from Jamie’s quick-start guide, with clear explanations, timestamp references, and an expert FAQ section.
If you’ve ever tried to paint your Blender model only to encounter cryptic errors about UVs and textures, you’re in the right place.
🧭 Note: This guide was performed in Blender 4.0. Interfaces vary slightly across versions; check the release details for your Blender version. However, the core workflow and main concepts of texture painting remain unchanged. For more details on feature or interface changes, you can always check the official Blender release notes.
Quick Guide: Painting Your First Model in Blender
- No more UV nightmares: Use Blender’s Add Simple UVs for instant mapping.
- Get the right workspace: Switch to Texture Paint and turn on Material Preview.
- Essentials first: Add a material, generate automatic UVs, and set up a base color texture.
- Jump into painting: Pick brush settings and color directly on your model.
- Save your work: Blender does not auto-save painted textures, so make sure to export them manually or use Save All Images.
💡 Need a quick refresher on terminology and feature set? Review Blender’s Texture Paint introduction!
Before we dive deeper, here’s why this approach helps newcomers.
Why UV Unwrapping Frustrates Beginners
Blender’s standard texturing pipeline expects users to understand UV mapping—a technical step that can overwhelm newcomers just looking to add color. Thankfully, with built-in automated tools like Add Simple UVs, you can get started fast and avoid most technical jargon.
Step-by-Step: From Blank Model to Painted Texture
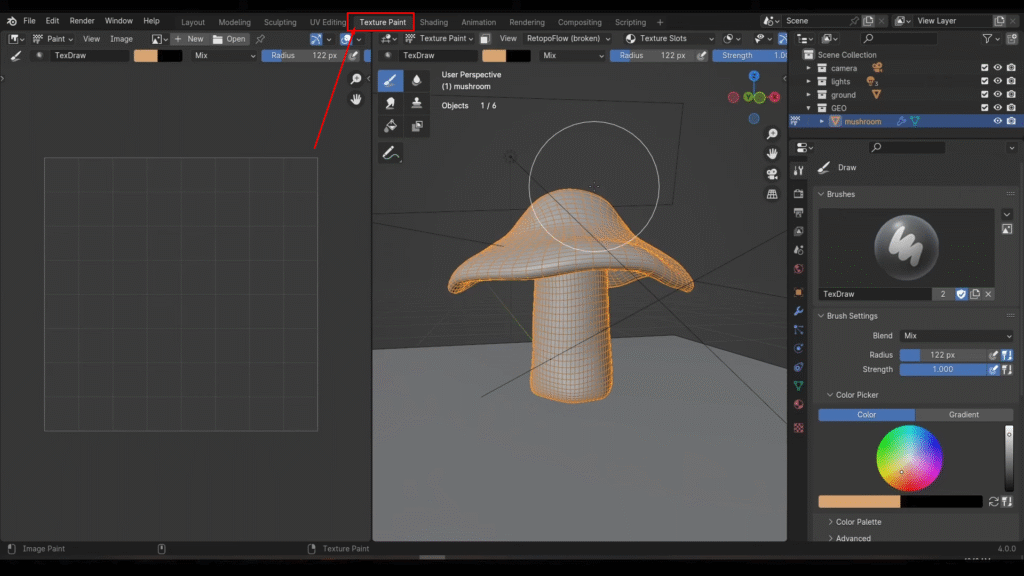
1. Start in the Texture Paint Workspace
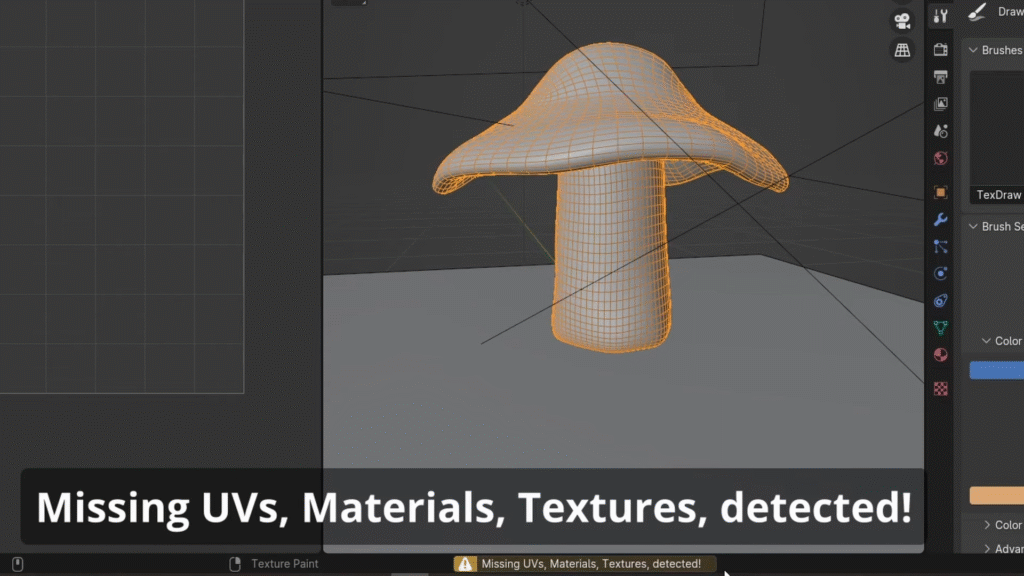
[00:56 – 01:17]
After creating your 3D object, you’ll first want to switch to the Texture Paint workspace. If you try to paint now, Blender will show an error: Missing UVs, materials, and textures. Let’s fix each requirement step by step.
2. Create a New Material
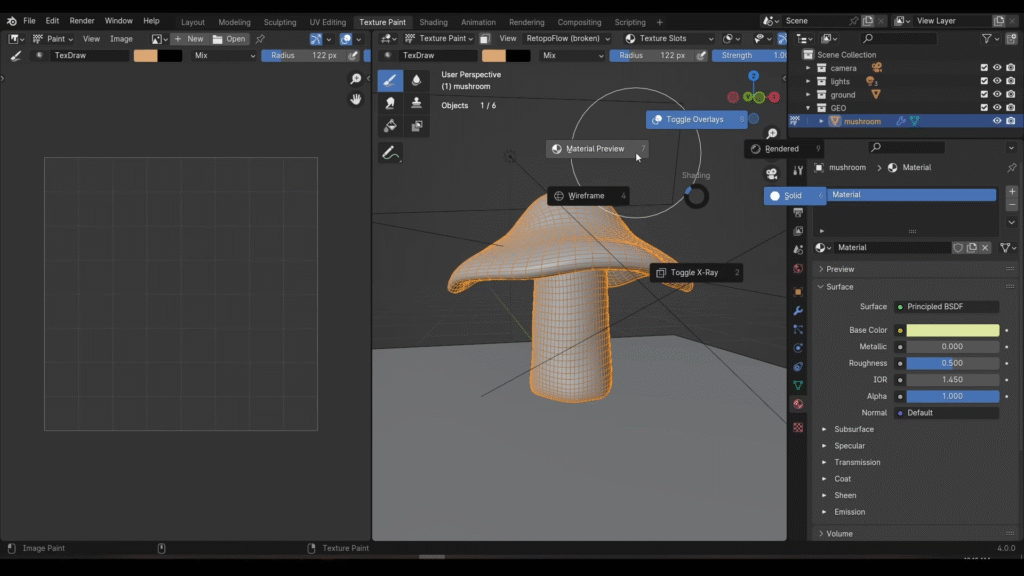
Next, go to the Material Properties tab and click New. Then, switch your viewport to Material Preview to see color changes live. For lighting basics that help you judge paint and materials faster, check out 3D Lighting 101.
3. Auto-Generate Simple UVs (With Limitations)
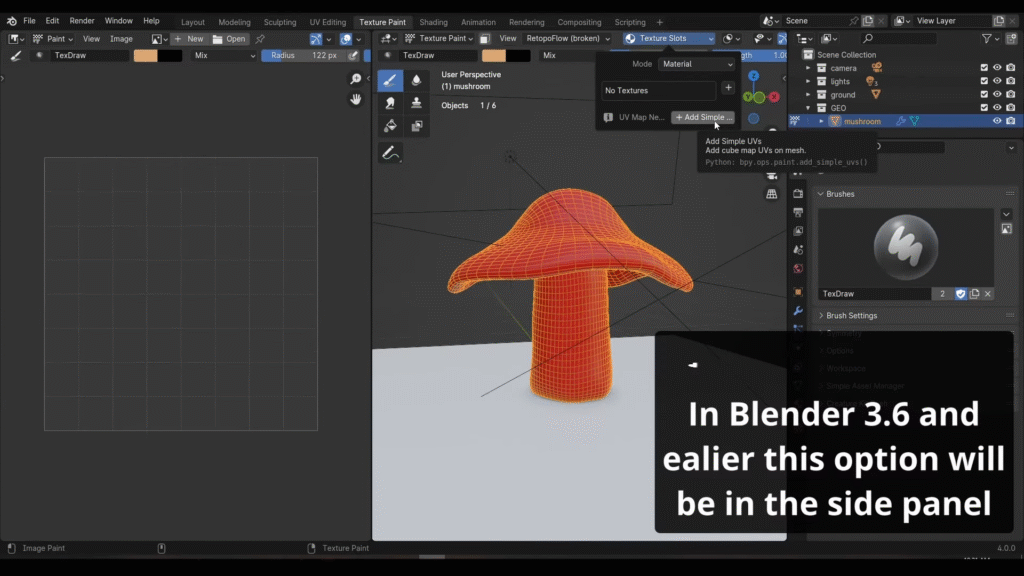
Then, in the Texture Slots menu, click Add Simple UVs. This instantly creates a UV map so you can start painting—even if you’ve never unwrapped a model before.
⚠️ Notes:
- Adding Simple UVs works best for low-poly or simply shaped models
(Add Simple UVs performs a basic cube unwrap + pack; Blender still recommends a custom unwrap for quality assets). - On complex meshes (like characters or intricate props), this method can cause UV stretching or uneven texel density. For high-quality assets, manually marking seams and unwrapping is recommended.
💡 If you don’t see the Add Simple UVs button, it’s likely your model already has UVs. In that case, go into Edit Mode, select everything, press “U” to open the unwrap menu, and choose Smart UVs. This will achieve the same result.
If you plan to refine topology for cleaner deforms and shading, see our Retopology guide.
4. Add an Image Texture

Next, in the texture panel, click the “+” button to create a Base Color image texture. Choose a resolution (e.g., 2048×2048 for high detail), select a base color, and then click add.
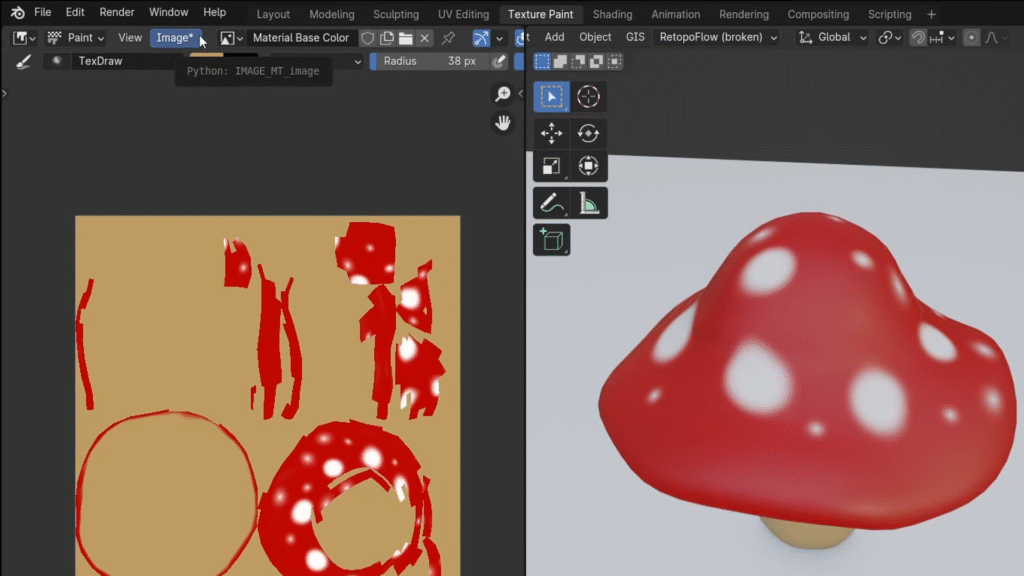
5. Start Painting
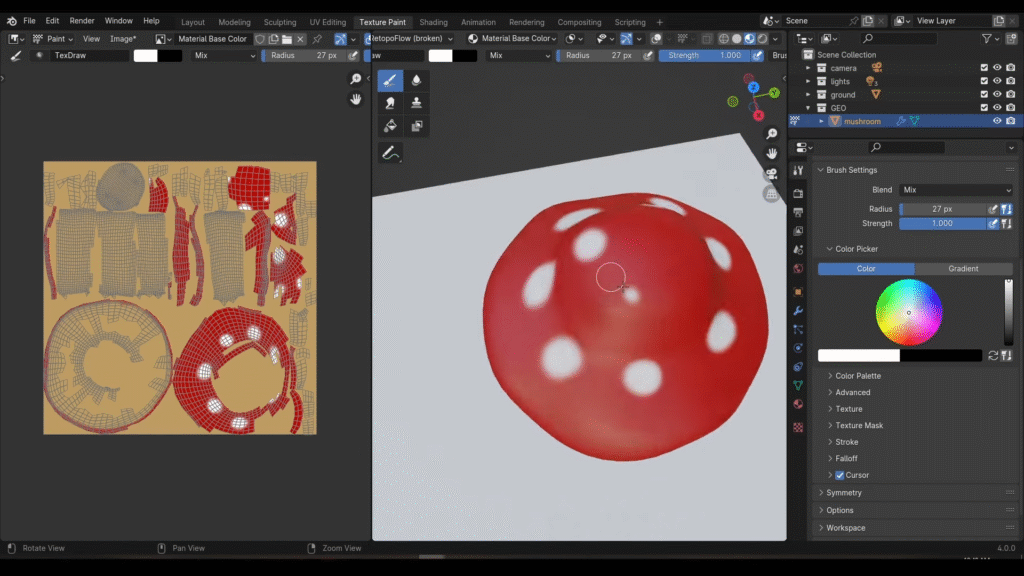
After that, set your brush’s color, radius, and strength.
Tips:
- Use the top menu or right-click for brush options.
- Press Shift + X to sample colors from the model.
- Paint details and experiment freely!
💡 If you’ve followed all the steps but still can’t paint on your model, you might have accidentally created multiple image textures by redoing a step. This can confuse Blender, as it won’t know which texture to paint on.
To fix this, open the Shader Editor, delete any extra Image Texture nodes, and make sure one Image Texture is still connected to the Base Color input of the Principled BSDF shader.
Before
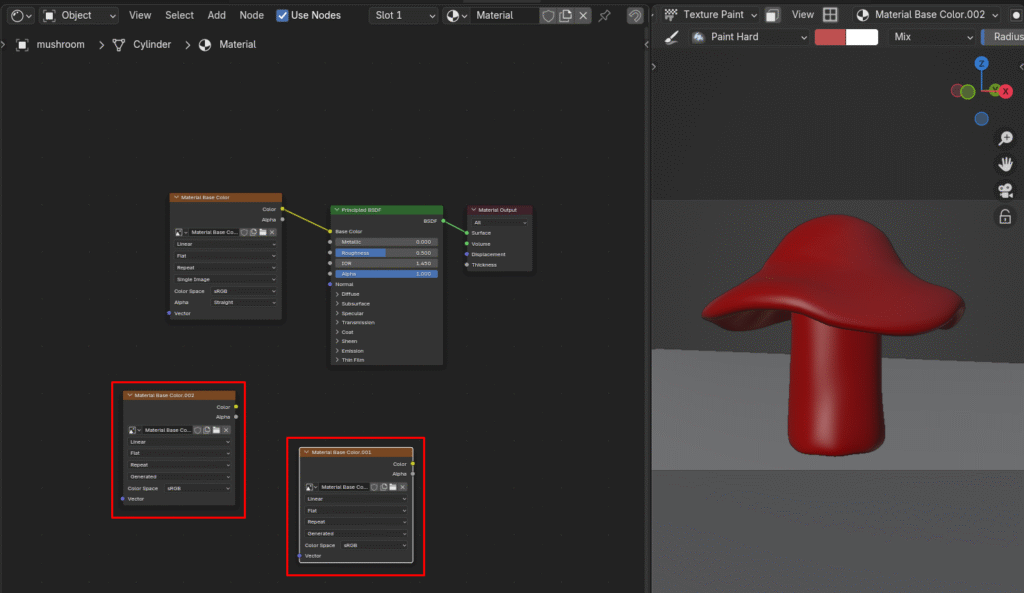
After
6. Save Your Painted Texture (Absolutely Critical!)
Blender does not save painted textures automatically, even when saving your .blend project.
Finally, to make sure you’re saving your progress, go to Image > Save As, name your file (e.g., mushroom_base_color.png), and choose PNG or JPEG. The small star in the image editor disappears once the texture is safely exported. You can also choose Save All Images to write every modified image at once.
🎉 Congratulations! You’ve Painted Your First Blender Model
This streamlined workflow is ideal for rapid prototyping, concept art, or hobby projects. As your skills grow, you can learn more about custom UV mapping and advanced painting techniques—but now, you’re ready to bring your 3D ideas to life with color!
Tip: Lighting can be crucial for highlighting the details of your work. Try taking your newly painted texture to the next level by learning more about light and atmosphere in our beginner’s guide to realistic scenes.
Still have questions? We’ve prepared some answers for you.
Frequently Asked Questions:
A1: Jamie points out that 3D artists sometimes overcomplicate things. For beginners, technical tools like Retopology and UV maps, while extremely important for complex models, often act as “gatekeepers”, frustrating new users and making them jump through multiple hoops just to perform basic operations like adding simple colors. The purpose of this video is to bypass complex UV seams, projection mapping, UDIMs, and other technical jargon, allowing users to quickly start painting their creations.
A2: When you try to paint on your model, Blender might display an error message: “missing UVS, materials and textures detected”. This means you need these three things to start:
• Material: Set up material for your model.
• UVs (UV Unwrapping): “Unwrap” your 3D model into a 2D UV map.
• Image Texture: An image file, like JPEG or PNG, used to hold the color data.
A3: You can find a warning message “UV map needed” under the “Texture Slots” dropdown menu, next to a button “Add Simple UVs”. Click this button to automatically generate UVs. While this layout may not be the most efficient (sometimes resulting in many UV islands and empty spaces), it’s sufficient to get you started painting. The “Add Simple UVs” option is equivalent to entering Edit mode, selecting all objects, pressing U to access the unwrap menu, and then choosing “Smart UVs”. If your model already has UVs, the “Add Simple UVs” button might not appear. In that case, use the unwrap menu and select “Smart UVs”.
A4: This is because you might still be in “Solid View” mode, which displays only a simple gray version of your model. To see the color changes, switch the viewport to “Material” view.
A5: Although you have created UVs, UVs themselves do not hold color data. For that, you need an image texture—a JPEG or PNG file that actually stores the color information. In the Tools menu, you’ll see “No textures” next to a “+” button. Click it to create a new texture.
A6: In the pop-up window, you can set the texture’s dimensions:
• For video game models, 1024×1024 is usually enough.
• For film and animation, Jamie recommends 2K (2048×2048) or larger.
• For a base color texture, you generally don’t need to set Alpha, and leaving it on won’t hurt.
• You can also set a base color as your canvas background.
A7: Select a color from the top viewport menu or side panel. Brush “strength” and “radius” can be adjusted at the top, or by right-clicking in the viewport. If you want to correct a section, you can re-sample an existing color on the model by hovering over it and pressing Shift + X (Blender 4.0 and later) or S (Blender 3.6 and earlier).
A8: The most crucial step is to save your texture. Blender does not do this by default; even if you save your scene file, the painted texture won’t be automatically saved to disk. If you skip this, your work will be lost when you reopen Blender. Go to the “Image” menu in the image editor. If the image hasn’t been saved yet, a little star icon will appear next to the menu.
💡 Use Save All Images to avoid losing painted textures.
A9: Jamie recommends using PNG or JPEG. He personally prefers PNG because JPEGs from Blender can sometimes have visible artifacts. Once saved, the star icon in the menu will disappear, confirming that your texture has been stored safely.
Final Thoughts
Texture painting doesn’t have to be intimidating. Thanks to Jamie Dunbar’s clear approach and Blender’s built-in tools, anyone can add color to their models within minutes. While automatic UV tools are fantastic for fast results, mastering manual UV unwrapping will give you more control and open doors to professional asset production.
And remember, sharing your 3D art is easier than ever with VIVERSE, your creative hub for all things 3D.
Just set up your free profile, upload your painted models, and build a world others can explore—no technical barriers, just creativity and community. To publish your work across engines in the browser, start learning more with VIVERSE Studio with an engine-agnostic approach.
Want to keep learning? Check out our first collaboration with Jamie Dunbar, all about Retopology, an essential technique for creating clean, animation-ready character models. You’ll find practical tips and clear explanations to help you optimize your 3D creations for animation and storytelling!
About the Video Author: Jamie Dunbar
Jamie Dunbar is the founder of Dragonboots Studios and brings over 15 years of experience in 3D animation to his work. Specializing in character creation, he has developed innovative approaches, like his Creature Kitbash addon—a LEGO-like sculpting tool for creating monsters—which allows artists to quickly design creatures through modular components. His expertise in educational animation combines technical ability with storytelling to help others master the art of 3D animation.