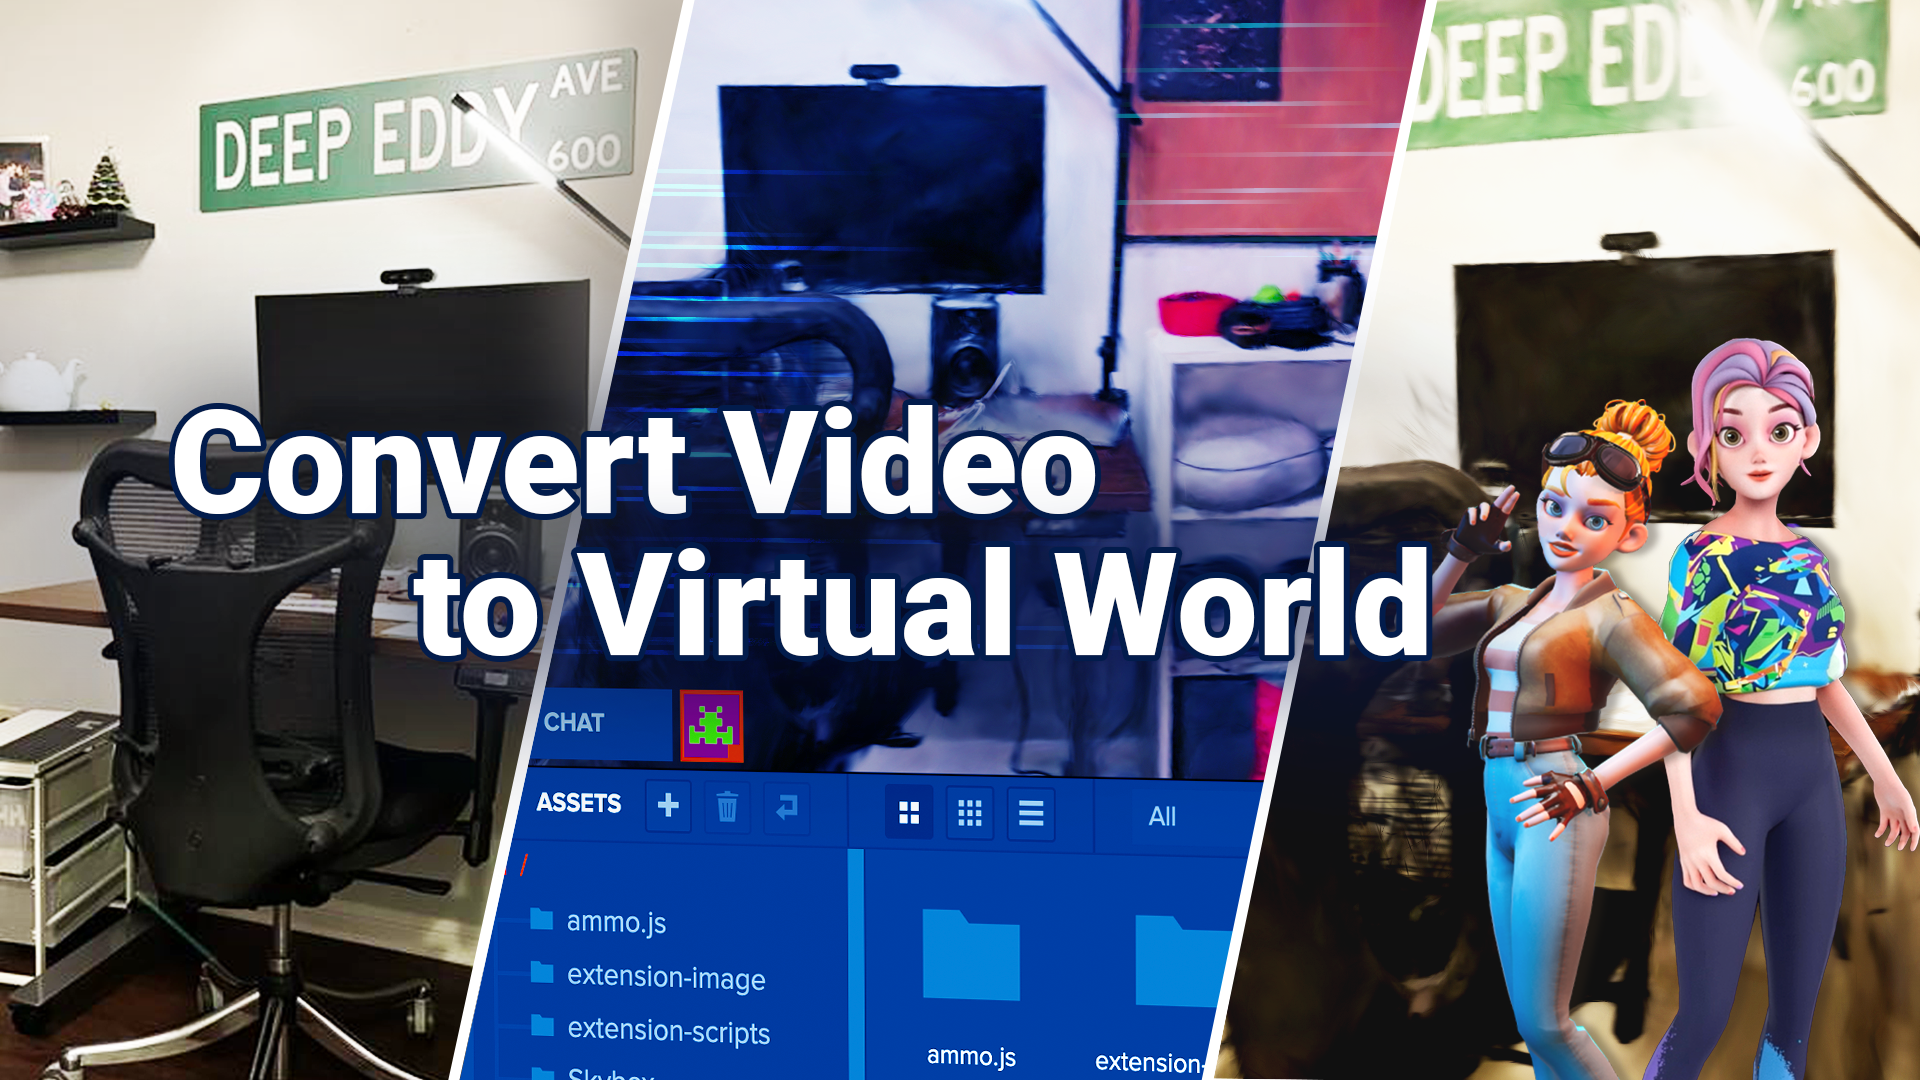
Turn Your Room into a Playable Virtual Space with Gaussian Splatting
Update 11/24/2025: VIVERSE now offers Scene AI, a video-to-Gaussian splat process that outputs a .ply file for use with VIVERSE and beyond. Learn how it was used to create a digital twin of Camp Taylor’s Riverfront campus.
In this step-by-step guide, we will show you how to create a photorealistic 3D digital twin of any physical space on VIVERSE using Gaussian Splatting and our PlayCanvas Extension.
Introduction
Hello everyone! I’m Michael Morran, a Developer Community Manager for VIVERSE, and I’m writing this guide to show you how to create a realistic Digital Twin of your physical space in VIVERSE. This work is made possible by cutting-edge tools, such as Luma Labs, which make it incredibly easy to convert a video of your space into a photorealistic 3D asset using Gaussian Splatting. In this guide, we will be building with VIVERSE’s PlayCanvas extension, which supports several tools for working with these assets.

Prerequisites
- A VIVERSE Account with Permission to Publish Worlds from PlayCanvas
This guide covers the full publishing process with PlayCanvas. Make sure you have fully set up your VIVERSE account and completed the Become a Creator form to have full publishing permissions.
- A PlayCanvas Account with the VIVERSE Extension Fully Installed
We will be working with the PlayCanvas editor to create our project and publish it to VIVERSE. You can follow these steps to create your PlayCanvas account and these steps to install the VIVERSE PlayCanvas Extension.
Step 1: Locate and Download Your Gaussian Splat Asset
There are several new and exciting tools for creating realistic 3D assets from simple scans of your physical space. While we will not walk through each step of the process, I recommend choosing between LumaLabs or Polycam to generate a Gaussian Splat of your space. Each 3D Scanning platform has intuitive, step-by-step instructions for generating your splat. Below is a quick comparison of the platforms…
| Luma Labs | Polycam |
| – Free tier only- Longer wait times- Forgiving to most scanning techniques | – Free & paid tiers- Faster asset generation- Requires more accurate scanning techniques |
 |  |
Step 2: Optimizing Your Gaussian Splat
After we have secured our Gaussian Splat, we will optimize the asset into a format compatible with VIVERSE. Often, Gaussian Splats can be quite large, even exceeding hundreds of megabytes; For compatibility with VIVERSE, we must compress our file using PlayCanvas’ tool Super Splat…
A. Navigate to the Super Splat editor on your web browser.
B. Drag and drop OR select “Scene” > “Import” to upload your .ply file.
C. (Optional) Super Splat has several helpful tools for removing unnecessary areas of a .ply file to reduce file size. You can use the “B” key to enable the Brush Select tool that can highlight and remove certain areas of your scan.
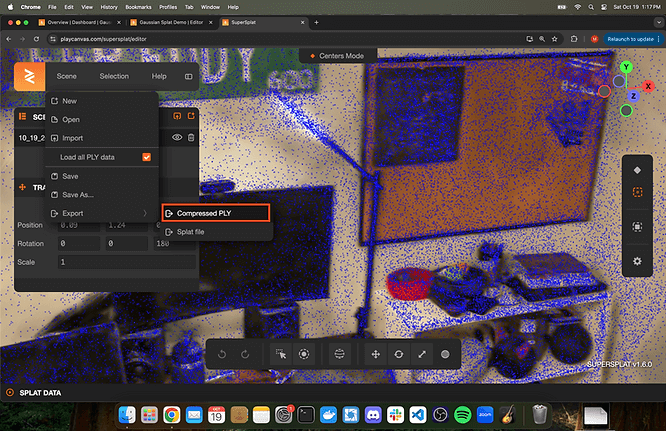
D. Select “Scene” > “Export” > “Compressed PLY” to export an optimized version of your scan.
Step 3: Adding Your PLY to PlayCanvas
Now that we have a .ply file that is compatible with VIVERSE, we will insert it into our PlayCanvas project using the editor’s built-in support for G-Splats…
A. Create a new project or open an existing project where you will use your .ply file.
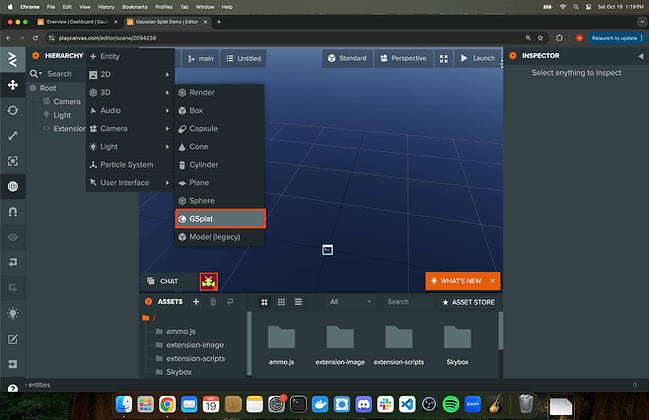
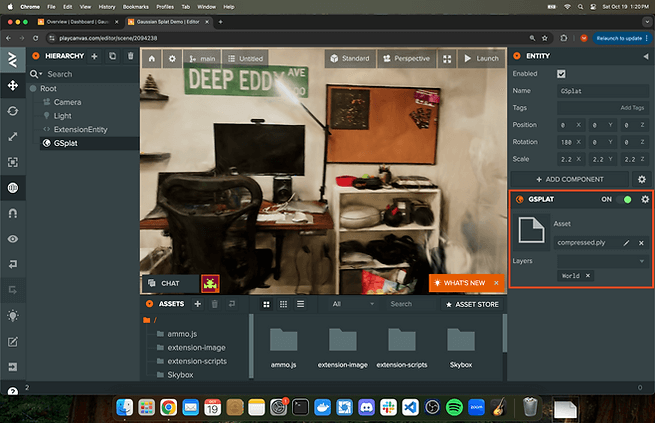
B. Above the entity hierarchy on the lefthand side, select the “+” button to open the entity menu. Select “3D” > “GSplat” to create a new entity for Gaussian Splats.
C. Drag and drop your .ply file into the asset menu on the bottom of the PlayCanvas editor and wait for it to upload.
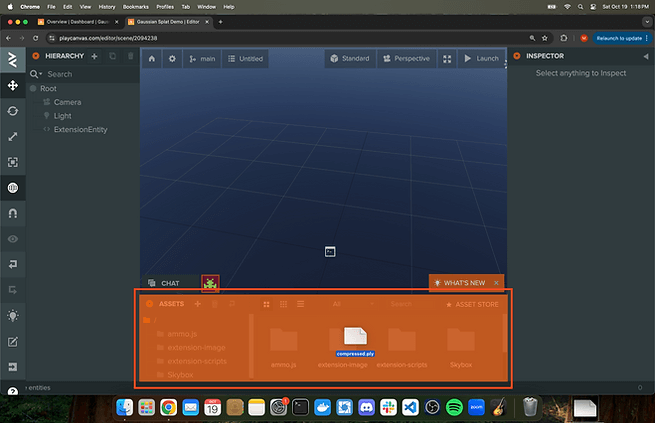
D. Select the new “GSplat” entity. In the entity details toolbar on the right-hand side, select the pencil icon next to the field for “Asset”. This will highlight the asset menu on the bottom of the editor where you can select the .ply file.
E. Wait for the 3D asset to render. Once complete, use the entity transform tools to control the scale, position, and rotation of the splat.
Step 4: Adding Required Functionality to Our Project
Once we have added the Gaussian Splat to our project, we must make sure that our project has the following requirements components in order to be published to VIVERSE…
Add A Spawn Point
A. Select the “+” button and add an empty entity to our project.
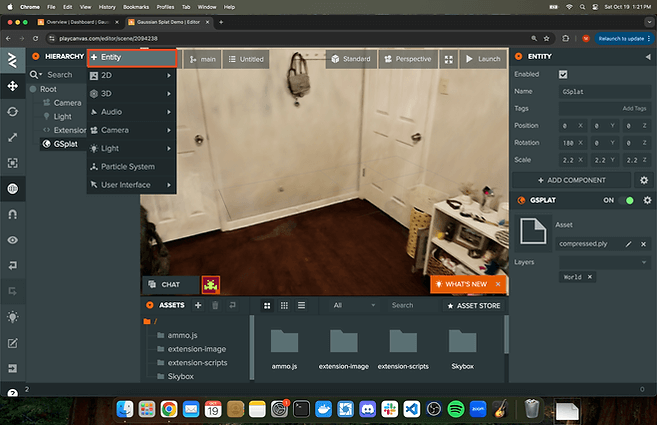
B. Adjust the entity’s position and rotation to specify where users should spawn in your virtual world. Scale will have no effect on the scale of your avatar when spawning into your world.
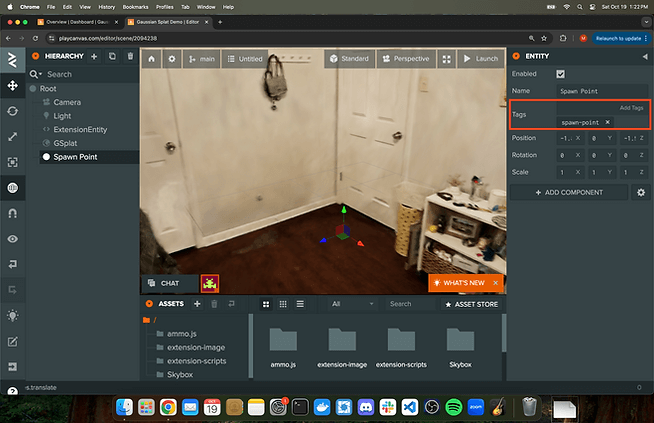
C. In the “tags” section of the entity details, add “spawn-point” so that VIVERSE will recognize this entity as a spawn point.
Add Colliders for Flooring
A. Select the “+” button and add an empty entity to our project.
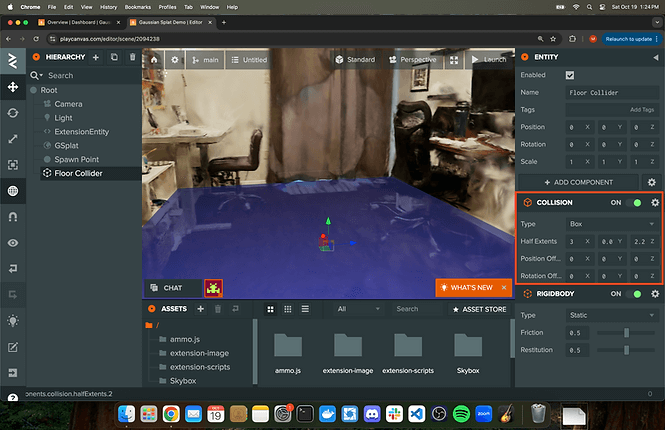
B. In the entity details, select “Add Component” > “Physics” > “Rigid Body” AND “Add Component” > “Physics” > “Collision”. If this is a new project, you see an error that prompts you to import the ammo physics system.
C. Keeping the collision type as “Box”, adjust the “Half Extents” to create a flat plane that will cover our floor. You can also adjust the entity’s position and the collider’s “Rotation Offset” to properly position this entity as your floor.
Disable Lights and Cameras
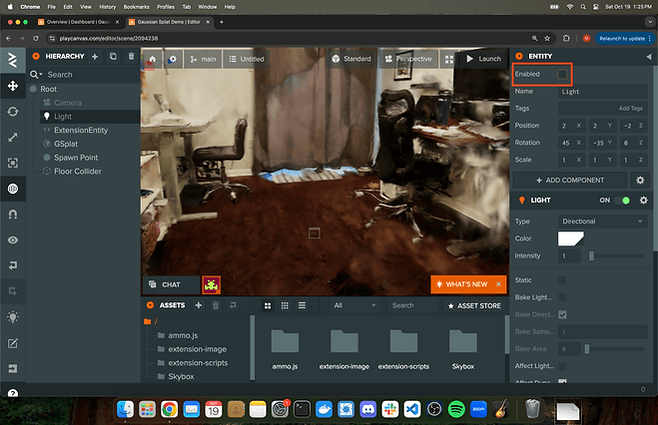
A. In your project hierarchy, disable any camera entities by right-clicking and deleting ORde-selecting the “Enabled” checkbox in the entity details.
B. In your project hierarchy, disable any lighting entities by right-clicking and deleting OR de-selecting the “Enabled” checkbox in the entity details.
(Optional) Step 5: Adding Basic Gameplay to Our Project
While not required, I want to show you how to give any visitors to your world some fun things to do in this space. VIVERSE’s PlayCanvas extension supports a no-code system for adding game mechanics to our project. For this example, I will show you how to play a sound when we click the computer seen in my Gaussian Splat…
A. Download your sound asset. For this example, I am using this mac startup sound .wav file created by DeVern that I found on Freesound.org
B. Upload the sound asset to PlayCanvas by dragging-and-dropping it onto the asset menu.
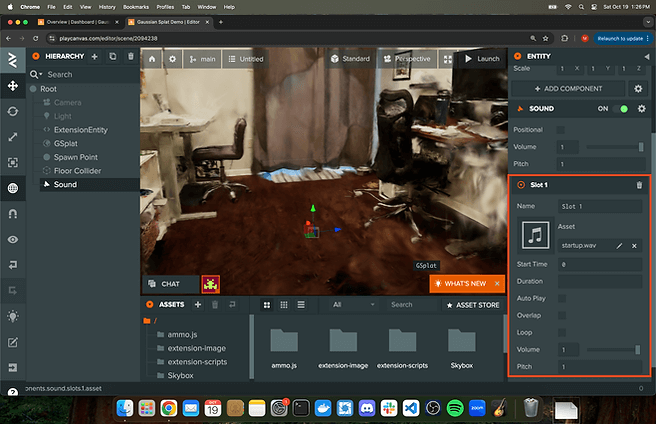
C. Select “+” > “Audio” > “Sound” to add a new sound entity to our project hierarchy. In the entity details, de-select “Positional” so that this sound does not interact with the position of the avatar. Next, select the pencil button in “Asset” to select the .wav file from our asset menu. This will automatically name the asset “Slot 1”.
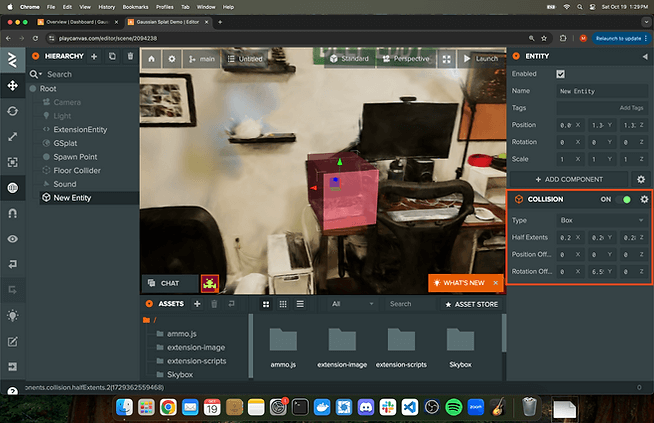
D. Select “+” and add an empty entity to our project hierarchy. Select “Add Component” > “Physics” > “Collision” to add the collider which will detect when the object is clicked.
E. Adjust the half extents and position of our entity to position it around the computer seen in my Gaussian Splat.
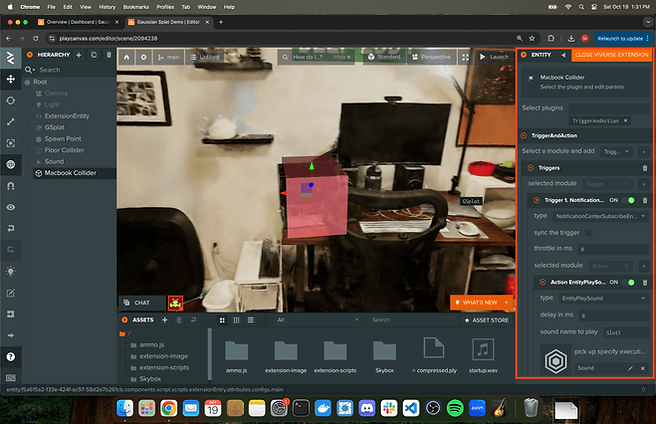
F. With the VIVERSE Extension enabled – you may need to click on the chrome extension and refresh your browser – select “Edit VIVERSE Extension” above the empty entity’s details.
G. In the “Select plugins” dropdown, select “TriggerAndAction”. Click the “+” icon next to the “Select module and add” dropdown to specify we are working the “Triggers” category. Select the “+” icon next to the “select module” dropdown to add a “Trigger”.
H. In the newly added “Trigger1”, open the “type” dropdown and select “NotificationCenterSubscribeEntityPicking”.
I. Click the “+” button next to the “selected module” dropdown to specify the action that will take place. In the dropdown of the newly created Action, select “EntityPlaySound”.
J. Type “Slot 1” in the “entity sound to play” field and click the pencil icon next to “pick up specify execution entity” to select the sound entity from the hierarchy. This will make it so that the macbook startup sound plays when an avatar’s cursor interacts with the collider on the empty entity.
Step 6: Testing and Publishing Your Project to VIVERSE
Now that our project is constructed and meets all requirements for publishing in VIVERSE, we can test the project and create our first world…
A. If you have not yet logged-in to your HTC account, select the small arrow button on the left-hand toolbar to begin the log-in process. It is very important to remember that the email address of your PlayCanvas account and the email address of your HTC account must be identical in order to publish the project.
B. Select the large “Download/Publish” arrow button on the left-hand toolbar. In the pop-up, you should see a section that reads “Download Remotely & Publish to VIVERSE”. Select the “Publish to VIVERSE” button and wait for the upload to complete.
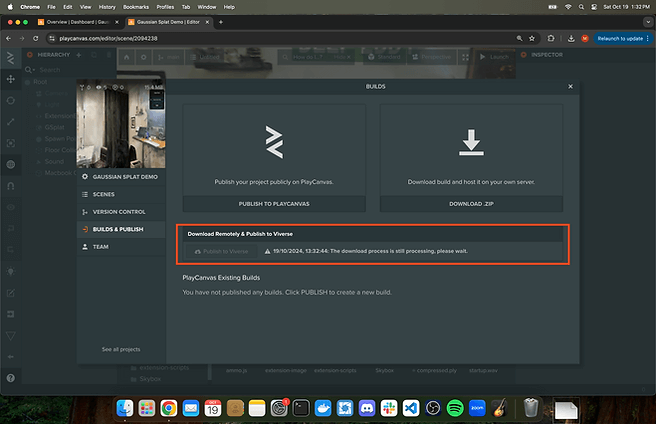
C. Once the project has been uploaded, you will see a “Preview” button. Select it and you will be directed to a new tab where you can test the scene as a VIVERSE avatar in single-player mode.
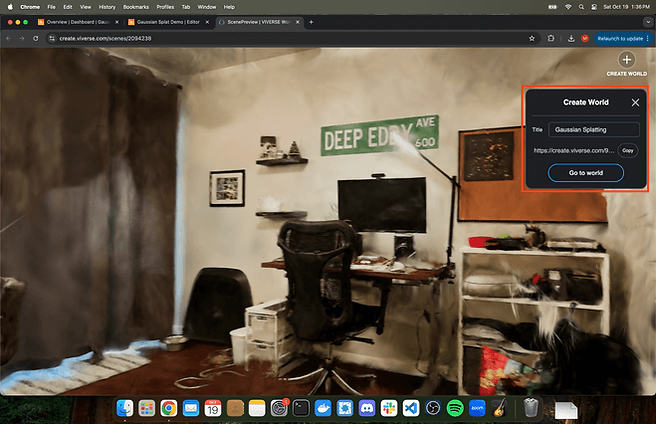
D. In the top right corner of the scene preview, there will be a “+” icon that reads “Create World”. Select this button and enter a name for the world when prompted. If the button will not select, your account is not yet verified with the full publishing permissions outlined in the prerequisites section of this guide. This will generate a world URL that you can share with other users to experience your project in multi-player mode. You will also see the world associated with your VIVERSE account.
Wrapping Up
So, there you have it! We have successfully used PlayCanvas to create a copy of our space in VIVERSE. Attached below is the link to my published world and the PlayCanvas project containing all of the assets I worked with. Try clicking on the computer seen in the scan with your audio enabled!
Published World: https://create.viverse.com/9eQmKkw
PlayCanvas Project: https://playcanvas.com/project/1267150/overview/gaussian-splat-demo
For more information on using the PlayCanvas extension for VIVERSE, please see our documentation which covers all the different gameplay mechanics that can be added to your project: https://docs.viverse.com/docs/viverse-create
